
How to make Digital Watermark using Adobe Photoshop?
Tuesday, November 13, 2007
While we publish any picture in a web page or a blog, it can be copied or saved by anyone who visit the page and can use it without any technical difficulties. The common technique used to prevent this is Digital Watermarking. In this method we paste a picture or some text containing the copyright information over the image, without any distraction to the original picture.
How to make Digital Watermark using Adobe Photoshop?
First of all decide the width and height of watermark. Here I am using dimensions as 'Width = 175,Height = 25,Resolution = 72 pix/inch, Mode = RGB color, Background = Transparent' (Refer Picture-1).
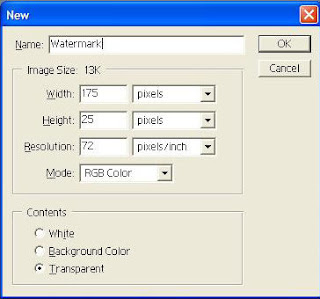
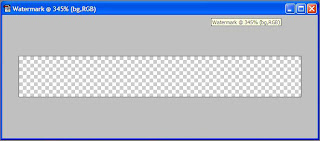
Open a new file in Adobe Photoshop (File > New). Give the required dimensions in the 'New' dialog box and press OK to get a new canvas (Refer Picture-2).
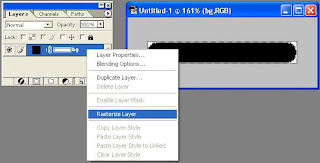
Now open 'Layers' Palette(Windows > Show Layers) and name the current layer as 'bg'(naming the layer is just for the sake of convenience). Select Rounded rectangle from tools and set the foreground color as black(000000). Draw a rounded rectangle on the canvas. Now the 'bg' layer has become a 'vector shape layer'. To convert this layer to an ordinary layer, right-click on the layer and click on 'Rasterize Layer' (Refer Picture-3).
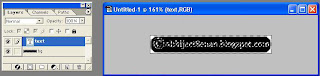
Now we create another layer (Layer> New > Layer) above this and name it as 'text'. Type the copyright information you want it . In this example I am using "© AbhijeetSenan.blogspot.com".
Now we select the text from the image by holding Ctrl key and clicking on the "T" icon of layer 'text' in the Layers palette. Now the text in the image is selected. Now hide layer 'text' by clicking the layer visibility icon (eye icon)(Refer Picture-4).
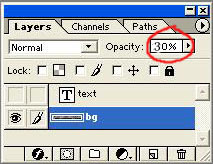
Then select layer 'bg' and press delete key (Del) to delete the selected area and the text is now visible in layer 'bg'. Now set the opacity of layer 'bg' to '30%' (Refer Picture-5).
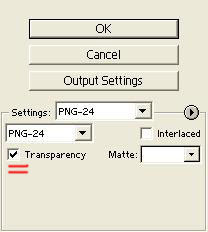
In order to use this image as a watermark we have to save the image with transparency. Select 'File > Save for Web' (Alt + Ctrl + Shift + S) and select the file format as PNG-24. Don't forget to select the 'Transparency' check-box (Refer Picture-6).
Before publishing any image, we can add this watermark by opening the PNG image in photoshop and 'Select > All' (Ctrl + A), 'Copy' (Ctrl + C) and paste(Ctrl + V) it over the image. For darker images invert the color by 'Image > Adjust > Invert' (Ctrl + I).

Note : For © symbol press Alt + 0169 on number pad (Num Lock should be ON).
OR
Select Start > Programs > Accessories > System Tools > Character Map and copy the symbol.
How to make Digital Watermark using Adobe Photoshop?
First of all decide the width and height of watermark. Here I am using dimensions as 'Width = 175,Height = 25,Resolution = 72 pix/inch, Mode = RGB color, Background = Transparent' (Refer Picture-1).

Open a new file in Adobe Photoshop (File > New). Give the required dimensions in the 'New' dialog box and press OK to get a new canvas (Refer Picture-2).

Now open 'Layers' Palette(Windows > Show Layers) and name the current layer as 'bg'(naming the layer is just for the sake of convenience). Select Rounded rectangle from tools and set the foreground color as black(000000). Draw a rounded rectangle on the canvas. Now the 'bg' layer has become a 'vector shape layer'. To convert this layer to an ordinary layer, right-click on the layer and click on 'Rasterize Layer' (Refer Picture-3).

Now we create another layer (Layer> New > Layer) above this and name it as 'text'. Type the copyright information you want it . In this example I am using "© AbhijeetSenan.blogspot.com".
Now we select the text from the image by holding Ctrl key and clicking on the "T" icon of layer 'text' in the Layers palette. Now the text in the image is selected. Now hide layer 'text' by clicking the layer visibility icon (eye icon)(Refer Picture-4).

Then select layer 'bg' and press delete key (Del) to delete the selected area and the text is now visible in layer 'bg'. Now set the opacity of layer 'bg' to '30%' (Refer Picture-5).

In order to use this image as a watermark we have to save the image with transparency. Select 'File > Save for Web' (Alt + Ctrl + Shift + S) and select the file format as PNG-24. Don't forget to select the 'Transparency' check-box (Refer Picture-6).

Before publishing any image, we can add this watermark by opening the PNG image in photoshop and 'Select > All' (Ctrl + A), 'Copy' (Ctrl + C) and paste(Ctrl + V) it over the image. For darker images invert the color by 'Image > Adjust > Invert' (Ctrl + I).

Note : For © symbol press Alt + 0169 on number pad (Num Lock should be ON).
OR
Select Start > Programs > Accessories > System Tools > Character Map and copy the symbol.
Labels: How to, Tips n Tricks, Tutorial
